Getting Started with OpenAI and R: Building a Chat Interface with Shiny
Picture a world where models can comprehend and reply to human language, facilitating genuine and smooth conversations. This remarkable concept is now a reality thanks to OpenAI’s advanced large language processing models. In this article, we will take a journey to examine a partnership between OpenAI and R, leading to the development of a lively and interactive chat interface utilizing the Shiny framework.
We will begin by setting up the OpenAI API and guiding you through acquiring the necessary keys to unlock its capabilities. As we delve deeper into R and its Shiny framework, you will discover the art of designing user-friendly interfaces that can hold conversations with users.
Setting Up OpenAI API
The OpenAI API is a valuable resource for developers, giving them access to advanced natural language processing models to integrate into their projects. These models can interpret and produce text that resembles human language, making them suitable for various applications like chatbots, virtual assistants, content creation, and translation. This section will explore the OpenAI API’s capabilities and guide you through the setup process.
OpenAI API Capabilities
The OpenAI API gives access to numerous language models, with GPT-3.5-Turbo being one of the most famous. The OpenAI API has the following significant capabilities:
- Natural Language Processing: The API is capable of analyzing and comprehending human language, allowing it to extract insights, sentiments, and meaning from text inputs.
- Text Generation: Because it can generate human-like text responses, it is an excellent tool for developing chatbots, virtual assistants, and content generators.
- Language Translation: The API can convert text from one language to another, making multilingual applications possible.
- Summarizes: It can summarise extensive text passages, making it handy for crafting brief summaries of articles or documents.
- Conversation Flow: Because the API can keep context and engage in dynamic dialogues, it is possible to create interactive chat interfaces.
Signing Up for an OpenAI Account
You’ll need to create an account before you can start using the OpenAI API. Here’s a simple guide to get you started:
- Head to the OpenAI Website: First, go to the OpenAI website by clicking here.
- Locate the “Get Started” Button: Look for the “Get Started” button in the top-right corner of the page.
3. Create Your Account: You’ll be asked to create an account by entering your email address and choosing a secure password.
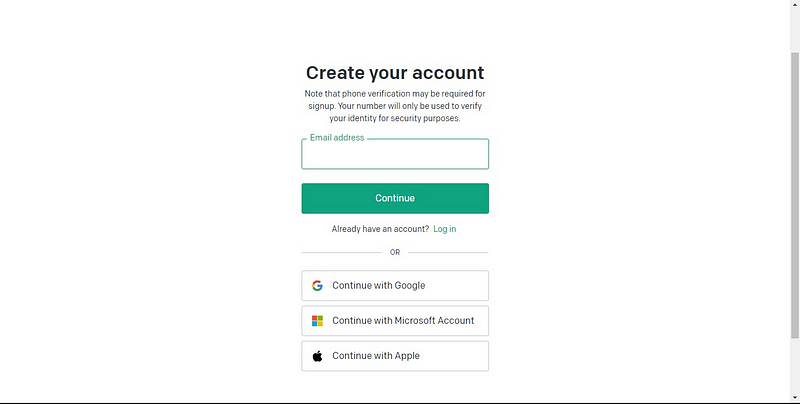
4. Finish the Registration Process: Follow the prompts on the screen to complete the registration process, which may involve verifying your email address.
5. Sign In to Your Account: Once your account is set up, you can access the OpenAI platform by logging in with your email and password.
Obtaining an API Key
To use the OpenAI API, you’ll need an API key. Here’s how you can obtain it:
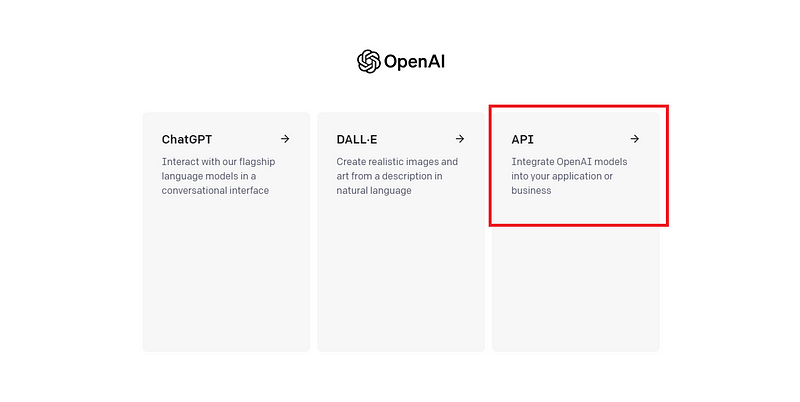
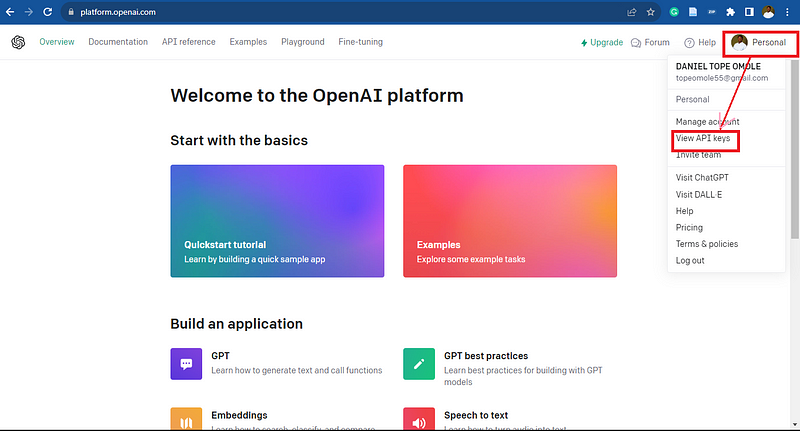
- Navigate to the API Section: After logging in to your OpenAI account, navigate to the API section. This is typically found in your account dashboard.
2. View API Keys: Navigate to the top right corner and click on the “Personal” link; from the dropdown, click View API Keys
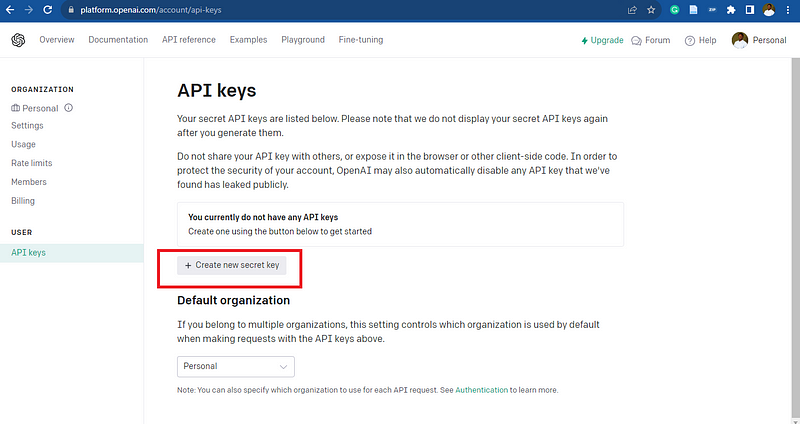
3. Create an API Key: In the API Keys section, you can create a new API secret key. Click on the “Create new secret key”.
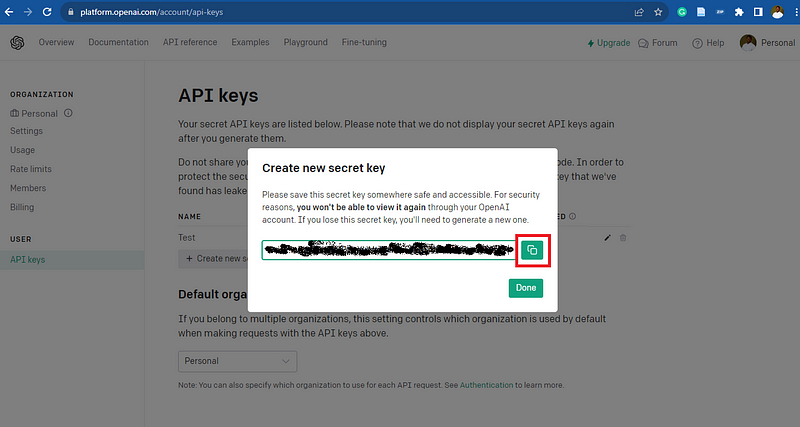
4. Generate the API Key: Fill out the name for the secret key you are about to generate. Though the name is optional, you can click on Create Secret Key.

5. Secure Your API Key: Once your key is generated, copy it, as you can only access it once. Ensure you save your key details in a safe location and that they are not shared publicly.
With your OpenAI account and API key, you can use the OpenAI API to build powerful natural language processing applications.
In the following sections, we’ll delve into integrating the OpenAI API with R and creating interactive chat interfaces using R Shiny.
R Shiny Basics
Shiny is an innovative web application framework for the R programming language designed to streamline the development of interactive and data-driven web applications. With its user-friendly interface and powerful capabilities, Shiny empowers data scientists and analysts to create custom web-based solutions for data visualization, analysis, and decision support, all within the R ecosystem. You can read more on the Shiny framework here.
What is Shiny and Its Use in Building Web Applications in R?
Shiny acts as a bridge between the web and R’s data analysis capabilities. It makes building web apps for R users simple. Here are some of Shiny’s key characteristics:
- Reactivity: Shiny apps may react in real-time to user interaction because they are reactive by nature. A crucial component that enables the creation of interactive and dynamic online programs is responsiveness.
- UI: Shiny offers tools and elements for building user interfaces for online programs. These UI elements can create interactive dashboards, data entry forms, visualizations, and other things.
- Shiny applications come with a server component that executes R code. Shiny programs are very flexible because this server logic can take user inputs, perform calculations, and return dynamic outcomes.
- Integration with R: Shiny interfaces with R easily, allowing you to leverage current R code, statistical models, data analysis pipelines, and data visualization techniques in your web applications.
- Deployment: Shiny applications are easy to share with others and deploy. You have a few options for hosting them: your server, Shiny Server, Posit Connect, or the Shinyapps.io hosting platform.
- Customization: Shiny facilitates web development but doesn’t limit your imagination. Using HTML and CSS, you can, if necessary, change the appearance and functionality of your applications.
Now that we have introduced the technologies we will be using, let’s dive into development.
Prerequisites
To get started, have R and RStudio installed on your computer. R is the programming language we’ll be using, while RStudio is an integrated development environment that will make working with R much easier.
- To download R, go to the official CRAN website (https://cran.r-project.org/).
- To get RStudio, visit the RStudio download page (https://www.rstudio.com/products/rstudio/download/).
Installing Required Packages
Now that you have the foundational tools, we must install a few R packages to help us build our chat interface. Open RStudio, and in your R script or console, run the following commands:
install.packages("shiny","openai","jsonlite")
- You can go through the Shiny documentation here
- The documentation for OpenAI in R is here
- Jsonlite package helps us to process JSON responses
Loading the Required Packages and Setting the Environment
library(shiny)
library(openai)
library(jsonlite)

##Setting the enviroment variables
Sys.setenv(openai_api_key = "{secret_key}")
#{Secret_key-- Input the secret key you copied from your Openai account here
Shiny utilizes its two fundamental components: the UI (User Interface) and the server.
Shiny’s UI Component
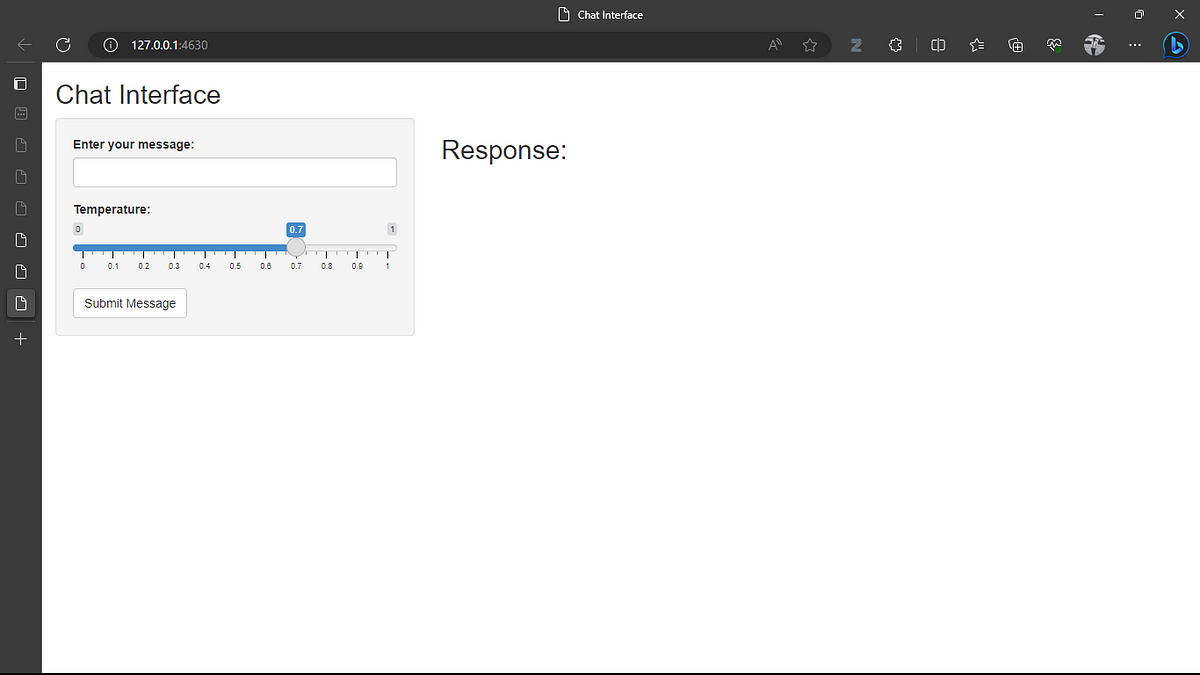
The UI component of Shiny is responsible for defining the layout and appearance of your web application. It provides a range of functions and elements that allow you to create a user-friendly interface for your application. Let’s develop the UI for the chat interface:
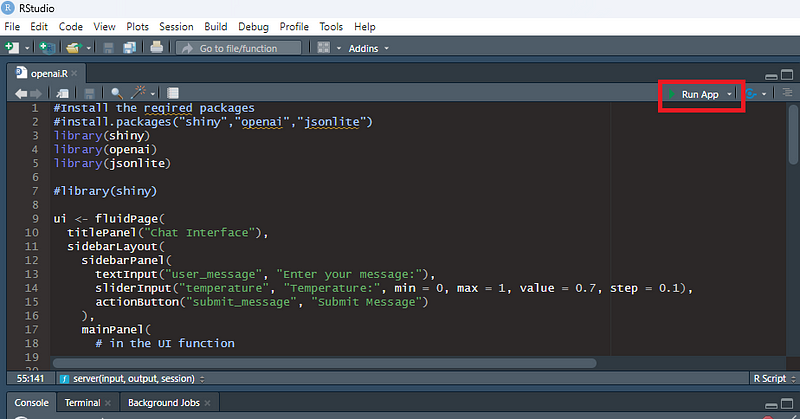
ui <- fluidPage(
  titlePanel("Chat Interface"),
  sidebarLayout(
    sidebarPanel(
      textInput("user_message", "Enter your message:"),
      sliderInput("temperature", "Temperature:", min = 0, max = 1, value = 0.7, step = 0.1),
      actionButton("submit_message", "Submit Message")
    ),
    mainPanel(
      # in the UI function
      titlePanel("Response:"),
      textOutput(outputId = "assistant")
    )
  )
)
This Shiny UI code creates a web page with a user-friendly chat interface. Users can input chat messages, adjust the temperature of responses, and click the “Submit Message” button. The chatbot’s responses will be displayed in the “Response” section of the web page as text outputs. Here’s a brief explanation of the code:
- `fluidPage`: In Shiny, the `fluidPage` function designs a web page layout that automatically adapts its content to the dimensions of the user’s web browser window.
- – `titlePanel`: This function’s role is to establish a title panel at the top section of the webpage. In this instance, it assigns the title “Chat Interface” to the page.
– `sidebarLayout`: The `sidebarLayout` function defines the overall webpage layout, typically featuring a sidebar panel on the left and a main panel on the right.
– `sidebarPanel`: Nested within the sidebar panel are several UI elements:
— `textInput`: This function creates a text input box labeled “Enter your message.” Users can utilize this input box to input their chat messages.
— `sliderInput`: The `sliderInput` function aims to generate a slider labeled “Temperature.” Sliders enable users to modify a numerical value within a specified range. In this context, it regulates the temperature, a hyperparameter influencing the text generation’s randomness. Values between 0 and 1 are valid, with lower values yielding more focused and deterministic text, while higher values introduce greater randomness.
— `actionButton`: This function generates a button labeled “Submit Message.” Users can employ this button to submit their chat messages. - `mainPanel`: Within the main panel, the subsequent elements are defined:
– `titlePanel`: Another title panel is created, labeled “Response.” This title serves to distinguish the input section from the response section.
– `textOutput`: This function designates a region where the chatbot or assistant’s responses will be exhibited. It specifies the `outputId` as “assistant_response,” which facilitates the dynamic updating of this area with the chatbot’s responses.
Shiny’s Server Component
The server component of Shiny is where the application’s logic resides. It handles user inputs, processes data, and generates dynamic outputs. Let’s write the server component:
server <- function(input, output, session) {
  chat_history <- list()  # Store chat history

  observeEvent(input$submit_message, {
    user_message <- input$user_message

    # Add user's message to chat history
    chat_history <- append(chat_history, list(list("role" = "user",
                               "content" = user_message)))

    # Clear the user input field
    updateTextInput(session, "user_message", value = "")

    # Call the create_chat_completion function
    assistant_response <- create_chat_completion(
      model = "gpt-3.5-turbo",
      messages = chat_history,
      temperature = input$temperature,
      openai_api_key = Sys.getenv("openai_api_key")
    )

    # Extract and append assistant's response content to chat history
    assistant_content <- assistant_response[[5]]
    chat_history <- append(chat_history, list(list("role" = "assistant",
                                              "content" = assistant_content)))
    # Update the chat display in the mainPanel
    output$assistant <-
      renderText({
        paste(assistant_content[4])
      })

     })
    }
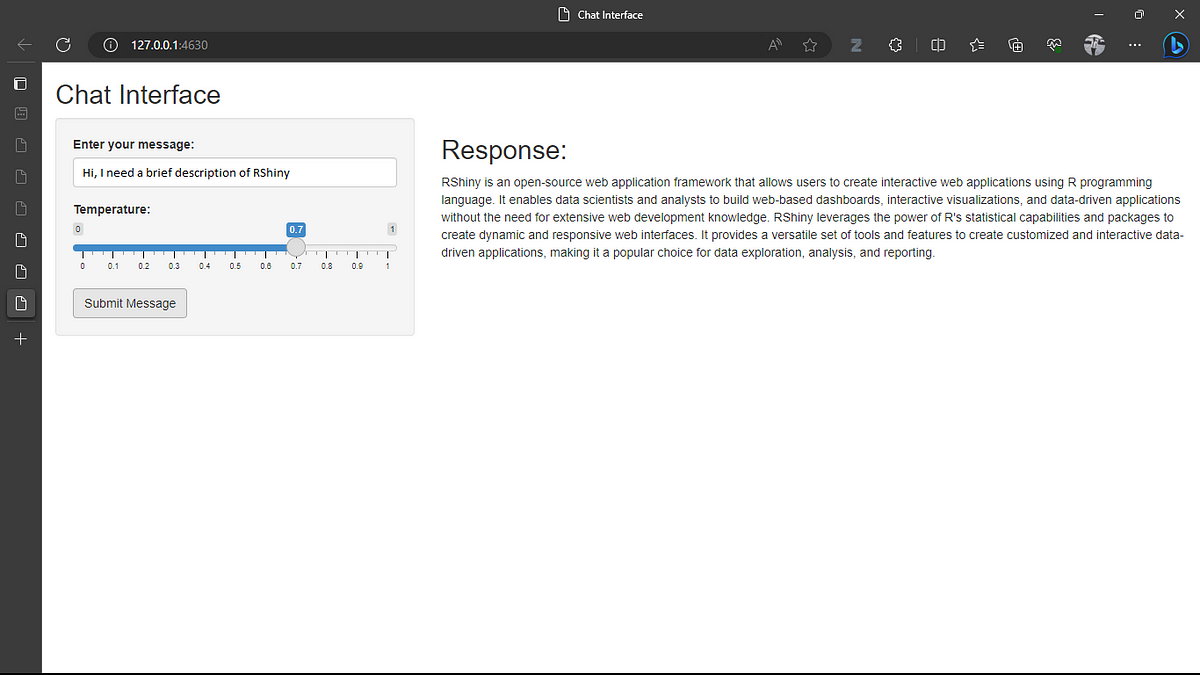
This server code handles the submission of user messages, interacts with the OpenAI API to generate an assistant’s response, updates the chat history, and displays the conversation in the chat interface. It ensures that the Shiny web application processes and displays user messages and assistant responses.
server: This is the server function in Shiny, which handles the server-side logic of the web application. It takes three arguments:input,output, andsession.chat_history: This list stores the conversation history in the chat interface. Each message in the conversation is represented as a list with a “role” and “content” key.observeEvent(input$submit_message, {...}): This part of the code sets up an observer that watches for the event when the “Submit Message” button is clicked (input$submit_message). When the button is clicked, the code within the block is executed.user_message <- input$user_message: It captures the user’s message from the text input field (input$user_message) and stores it in theuser_messagevariable.chat_history <- append(...): This line appends the user’s message to thechat_historylist as a new entry with the role “user” and the content being the user’s message.updateTextInput(...): It clears the user input field (input$user_message) by updating its value to an empty string and removing the text box after the user submits a message.create_chat_completion(...): This line calls thecreate_chat_completionfunction, and interacts with the OpenAI API. It sends the user’s chat history, including their message, to the OpenAI model for generating an assistant’s response. Thetemperatureparameter is used to control the randomness of the response.assistant_content <- assistant_response[[5]]: This line extracts the content of the assistant’s response from theassistant_response. The specific index[5]corresponds to the content of the response.output$assistant <- renderText({...}): This part defines a text output element namedassistant. It renders the assistant’s response content and makes it available for display in the UI.
Interaction Between UI and Server
The beauty of Shiny is its ability to connect the UI and server components seamlessly. Whenever a user interacts with a UI element, like submitting a form or adjusting a slider, the server component responds by running the necessary R code. The changes are then displayed in the UI, creating an engaging and interactive user interface.
#Add the final Shiny code that integrate the UI and the Server logic together
shinyApp(ui, server)
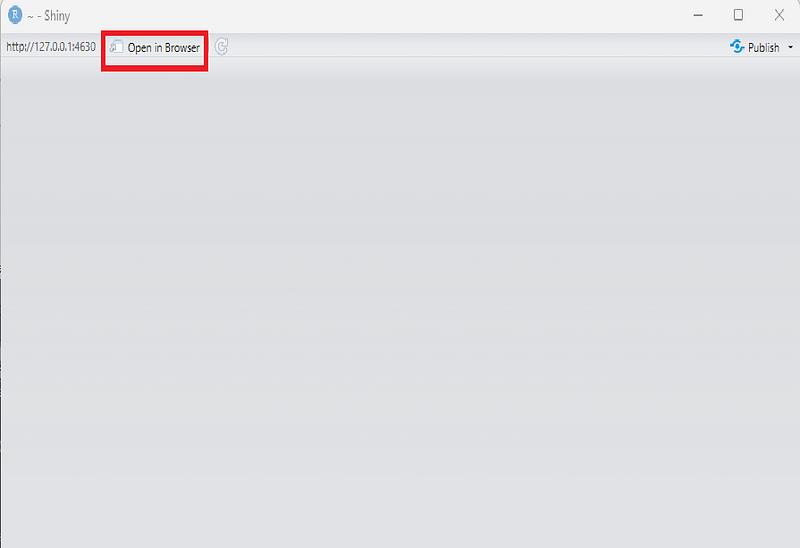
After adding all the code to your R script, run the app and open the interface in your browser.
Conclusion
This article explored the combination of OpenAI and R in creating chat interfaces. You can build engaging and interactive chatbots with natural language processing and analytical capabilities by using OpenAI’s language models like GPT-3.5-Turbo and seamlessly integrating them with R Shiny. This fusion has numerous benefits, including real-time interactivity and effortless deployment. When building chat interfaces, it can be helpful to explore advanced features and customization options so that your chatbot can be tailored to specific industries and applications. Armed with this knowledge, you can create chat interfaces that are intelligent, responsive, and highly functional, ultimately enhancing user experiences and streamlining interactions across diverse domains.
You can access the repo for the project here.
Related Articles